Effect of corrugation structure and shape on the mechanical stiffness of the diaphragm
This is an Open Access article distributed under the terms of the Creative Commons Attribution Non-Commercial License(https://creativecommons.org/licenses/by-nc/3.0/) which permits unrestricted non-commercial use, distribution, and reproduction in any medium, provided the original work is properly cited.
Abstract
Here, we studied the change in the mechanical stiffness of a diaphragm according to the corrugation pattern. The diaphragm consists of a silicon oxide and nitride double layer; a corrugation pattern was formed by dry etching, and the diaphragm was released by wet etching. The fabrication of the thin film was verified using focused ion beam and scanning electron microscopy images. The mechanical stiffness of the diaphragm was obtained by measuring the surface vibration using a laser Doppler vibrometer while applying external sound pressure. Flat squares, diaphragms with square corrugations, and circular corrugation patterns were measured and compared. The stiffness of the diaphragm with a corrugation structure was found to be smaller than that without a corrugation structure; in particular, circular corrugation showed a better effect because of the high symmetry. Furthermore, the effect of corrugation was theoretically predicted. The proposed corrugated diaphragm showed comparable flexibility with the state-of-the-art MEMS microphone diaphragm.
Keywords:
Corrugated diaphragm, Residual stress, Corrugation pattern, MEMS microphone1. INTRODUCTION
Diaphragm structures are widely used for microelectromechanical system transducers, specifically acoustic transducers, such as MEMS microphones. Because the output voltage is proportional to the diaphragm movement, a low stiffness of the diaphragm is required to detect a small sound. To achieve low stiffness, the diaphragm is typically fabricated with a thickness of less than 1 μm. Owing to this thin thickness, the mechanical behavior of the diaphragm is dominated by the residual stress acting on the thin film rather than the bending stiffness [1]. The residual stress of the thin film reaches hundreds of MPa because the deposition process is performed at high temperatures [2]. Considering that the residual stress must be controlled to less than or equal to 10 MPa to detect a small sound pressure, the fabrication process and design must be optimized to reduce residual stress [3].
The corrugated diaphragm, as shown in Fig. 1, is an effective method for reducing the residual stress of the diaphragm [4-6]. Previous studies attempted to determine the relationship between the design parameters and reduced residual stress only by considering the cross-view aspect. For example, the corrugation depth (hc) and the number of corrugations are considered important parameters for reducing the residual stress [5,6]. However, the corrugation shape from the top view has not been previously analyzed.
A circular diaphragm is mainly used for MEMS microphones, but a square diaphragm resulting from the anisotropic wet-etching process is also widely used [1]. The use of a circular diaphragm indicates that a circular corrugation pattern is used [7]. However, for square diaphragms, both square and circular corrugation patterns have been reported [5,6], but the difference in the mechanical stiffness of the diaphragm has not been directly compared.
In this study, we experimentally investigated the effect of the corrugated diaphragm and its shape on the mechanical characteristics. As a reference, a square diaphragm without corrugation was also fabricated and compared with square and circular corrugation diaphragms. The proposed corrugated diaphragm structure is made of a silicon oxide and nitride double layer with a metal layer on the top, and the diaphragm was released by the wet-etching process [8]. The surface velocity of the diaphragm was measured using a laser Doppler vibrometer (LDV), and the mechanical properties based on the corrugation pattern were compared.
2. DESIGN AND FABRICATION
2.1 Corrugation diaphragm design
A corrugated diaphragm is designed to effectively reduce residual stress. However, it is vulnerable to fracture; thus, it is designed with an emphasis on processability. Thus, silicon wet etching using potassium hydroxide (KOH) was used to release the diaphragm [8]. As a result of the anisotropic wet-etching characteristics, a square diaphragm was obtained. Silicon nitride (Si3N4) and silicon oxide (SiO2) were used as diaphragm materials. This Si3N4/SiO2 double layer not only acts as a diaphragm but is also used as a backside mask during wet etching using KOH. In addition, Si3N4 experiences tensile stress, whereas the SiO2 film experiences compressive stress; thus, the mean residual stress can be reduced, which leads to a smaller mechanical stiffness of the diaphragm.
| (1) |
For a square diaphragm with a high residual stress, the equivalent stiffness of the diaphragm can be calculated using Eq. (1) [1]. keq is equivalent stiffness of the diaphragm, σ0 is the residual stress, and t is the diaphragm thickness. It can be seen that the residual stress directly affects the equivalent stiffness of the diaphragm. The corrugated diaphragm significantly reduces the residual stress through its structure, and the effective residual stress can be calculated according to the corrugation design.
| (2) |
For a circular diaphragm with a circular corrugation pattern, the effective residual stress (σeff) can be calculated using Eq. (2), where a is the half-length, β is the corrugation angle, hc is the corrugation depth, bc and wc are the widths of the corrugation pattern, and Nc is the number of corrugations [4]. Fig. 1 provides a graphical explanation. Among the design parameters, the ratio of the corrugation depth to the diaphragm thickness (hc/t) exhibits the greatest effect on the residual stress relief. When hc/t is sufficiently high, the effective residual stress is proportional to (t/hc)2. In addition, the residual stress decreases with the number of corrugations. However, if the corrugation depth is too large, the possibility of diaphragm failure during fabrication is high; therefore, the ratio was set to 5 in this study. Table 1 lists the design values.
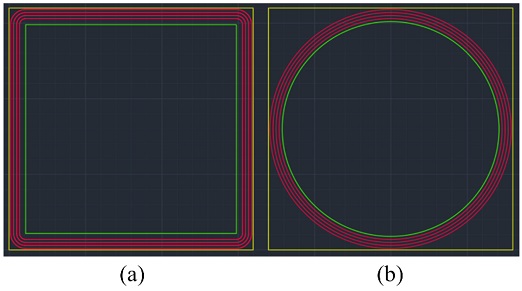
Fig. 2 presents a top view of the corrugated pattern. A square corrugation pattern (Fig. 2(a)) and circle corrugation pattern (Fig. 2(b)) were proposed for comparison. The yellow square represents the square diaphragm, red patterns represent the corrugation shape, and the green squares and circles represent the metal patterns in the diaphragm. This metal layer was used as a reflector in the diaphragm stiffness measurement experiment using LDV. The outer diameter of the circular corrugation pattern was set equal to the length of the outer side of the rectangular corrugation pattern. Other detailed design parameters are the same in the two cases, as shown in Table 1.
2.2 Fabrication Process
A six-inch, P-type, <100> crystal orientation silicon (Si) wafer was prepared with a thickness of 500 μm. A double-sided polished wafer is required for the formation of the diaphragm. An SiO2 layer with a thickness of 100 nm was deposited by thermal oxidation [Step (a)]. The SiO2 layer and Si were dry etched at 100 nm/3 μm, respectively [Step (b)]. For a flat square diaphragm without a corrugation pattern, this step was neglected. Low-stress LPCVD silicon nitride (Si3N4) was deposited with a thickness of 500 nm [Step (c)]. Owing to the low-stress LPCVD Si3N4 deposition process, the stress gradient along the diaphragm thickness direction was small compared with the ordinary Si3N4 film case. Next, a 150 nm Ni/Au metal layer was patterned using the lift-off method [Step (d)]. The Si3N4/SiO2 layers were dry etched to open the window [Step (e)], and KOH wet etching was performed [Step (f)]. Further, 25–30 wt.% with the temperature of 80 to 90oC condition of KOH solution was used. To protect the front side of the wafer, it was etched safely using a specially prepared apparatus [8]. The diaphragm was fabricated in approximately 5 h.
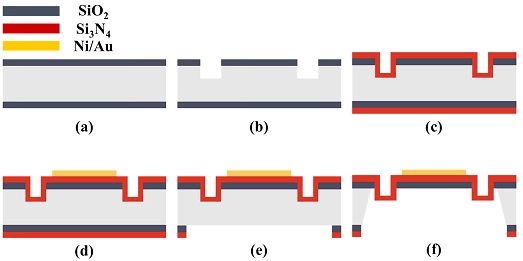
Fabrication process; (a) Thermal oxidation (100 nm) (b) Dry etch SiO2 and Si (100 nm/3 μm) (c) LPCVD Si3N4 deposition (500 nm) (d) Ni/Au Patterning (e) Backside Si3N4/SiO2 Dry etching, and (f) KOH wet etching.
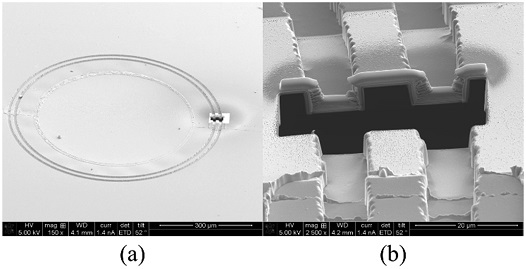
To confirm that the corrugation of the diaphragm was well patterned, a focused ion beam (FIB) was used to cut the diaphragm, and the cross view of the corrugation pattern was observed using scanning electron microscopy (SEM). Fig. 4(a) demonstrates the part cut out with FIB from the circle-shaped corrugated diaphragm, and Fig. 4(b) demonstrates an enlarged view of that part. A corrugation diaphragm was successfully fabricated, as designed. However, the dry etch for corrugation formation in Step (b) was slightly over etched; thus, the measured corrugation depth was 4.3 μm.
3. MEASUREMENT PRINCIPLE AND SETUP
To measure the mechanical stiffness of the diaphragm, the surface velocity of the diaphragm was measured using LDV while applying a sound pressure generated by the speaker. Fig. 5 shows the schematic figures of the measurement principle and its equivalent lumped model. Because the diaphragm is small in size, including the substrate (- 1 mm) compared with the wavelength of the applied sound pressure, and the diaphragm vibrates under the first resonance frequency, it can be approximated as a lumped diaphragm. The equivalent mass (meq), stiffness of the diaphragm (keq), and radiation impedance (Rr, Xr) were modeled. The material damping of silicon was neglected because of the negligible material damping effect of silicon [9]. Owing to the ventilation expressed in Fig. 5(a), the air behind the diaphragm is not trapped and therefore does not act as a stiffness.
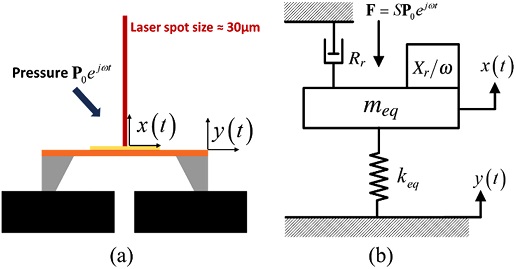
Lumped element model of the diaphragm; (a) Schematic figure of the diaphragm with laser and (b) its lumped element model.
When the external sound pressure (P0ejωt) is applied to the diaphragm, the diaphragm and substrate vibrate simultaneously. Therefore, to measure the diaphragm stiffness, the vibration of both the diaphragm and substrate should be measured and considered when calculating the diaphragm stiffness. In Fig. 5(b), the displacements of the center of the diaphragm and substrate are expressed as x(t) and y(t), respectively. If there is no phase difference between x(t) and y(t), a simple displacement subtraction is sufficient for calculating the stiffness of the diaphragm. However, if a phase delay exists, it should be considered when calculating the stiffness.
The phase difference is caused by the mass and resistive components acting on the diaphragm, that is, the acoustic radiation impedance and diaphragm equivalent mass. If the reaction force because of the radiation and mass is negligible compared with the stiffness force, we can assume that the displacement of the diaphragm and substrate are in phase with the applied external pressure so that no phase delay between the diaphragm and substrate can be guaranteed.
Equation (3)-(5) shows the theoretical expression of the radiation impedance and equivalent mass, where k is the wave number (k = ω/c0), c0 is the sound speed, S is the area of the diaphragm, and ρ0 is the density of the air [1]. The driving frequency is assumed to be 1 kHz at room temperature, and the diaphragm geometry conditions listed in the Table 1 provides the radiation resistance and reactance force in the order of ~1021and ~10-2, respectively. The order of the inertia force is similar to the radiation reactance, ~10-2 order is calculated. Considering that, in the case of diaphragm stiffness, its order is ~102 even at the state-of-art level [10], we can conclude that there is no phase delay between the diaphragm and substrate.
| (3) |
| (4) |
| (5) |
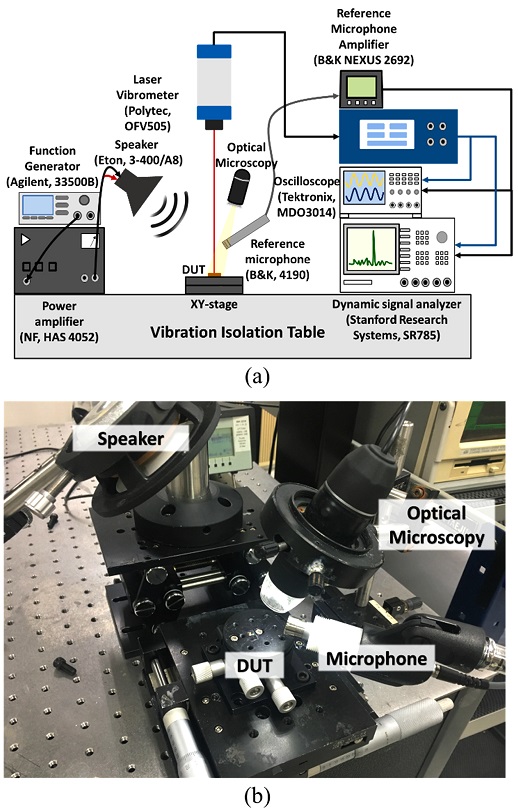
Fig. 6 shows a schematic of the measurement setup and a photograph of the experimental setup near the sample. The diaphragm to be measured, that is, the device under test (DUT), was installed in the XY stage and tilting stage. Using optical microscopy, the laser point from the LDV (Polytec, OFV505) can be precisely located at the center of the diaphragm. An electric signal was produced and amplified by a function generator (Agilent, 33500 B) and a power amplifier (NF, HAS 4052), and applied to the speaker (Eton, 3-400/A8) to generate sound pressure. The applied pressure was also measured using a reference microphone (B&K, 4190) to calibrate the diaphragm movement. The output signal from the LDV was monitored and analyzed using an oscilloscope (Tektronix, MDO3014) and a dynamic signal analyzer (Stanford Research Systems, SR785). Two points (center of the diaphragm and substrate) were measured separately to calculate the diaphragm stiffness.
3. RESULTS AND DISCUSSION
Table 2 lists the measured mechanical properties of the diaphragm, based on the corrugation patterns. Three different structures were compared: flat square diaphragm, square corrugation, and circular corrugation diaphragm. For each design, more than seven samples were analyzed for experimental reliability, and their arithmetic mean values are listed in Table 2. The measured equivalent stiffness of the flat square diaphragm was approximately 688 N/m, whereas the square and circular corrugation diaphragms showed smaller values (110 and 55 N/m, respectively), which proves the residual stress reduction of the corrugated structure. Particularly, the circular corrugated diaphragm exhibited the best effect. The measured stiffness values differed by approximately two times according to the shape of the corrugation. This is believed to be the high symmetric characteristics of the circular corrugation pattern. Since corrugation reduces the residual stress in the normal direction of the corrugation pattern, a conflict occurs especially at the vertex in the square corrugation pattern. Fig. 7 presents a photomicrograph of the fabricated corrugation diaphragm. As shown, the circular corrugation shows a tight, well-made diaphragm, but the square corrugation exhibits buckling at the vertex. This buckling phenomenon should be avoided for applications such as MEMS microphones or ultrasonic transducers because it causes higher stiffness, nonlinearity, and instability [11].
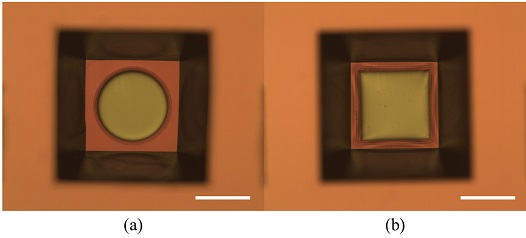
Photomicrograph of corrugated diaphragms; (a) Circle corrugation and (b) square corrugation. (Scale bar: 500 μm)
For a flat square diaphragm, the residual stress was calculated as 38.2MPa through Eq. (1). The effective residual stress calculated using Eq. (2), based on the geometry conditions in Table 1, is 3.19 MPa, which is very close to the value obtained from the circular corrugation. Notably, Eq. (2) works well with the square diaphragm, indicating that the specific shape of the diaphragm may not be important, but the corrugation shape is.
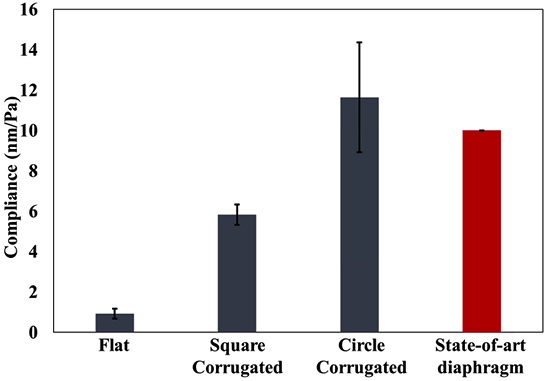
Fig. 8 demonstrates the measured compliance, which represents the diaphragm displacement when a unit pressure is applied. Error bars indicate standard deviations. For a state-of-art MEMS microphone, the compliance of the diaphragm is approximately 10 nm/Pa [10]. The circle corrugation diaphragm shows higher compliance, which proves that the proposed diaphragm design is appropriate for the MEMS microphone diaphragm.
5. CONCLUSIONS
In this study, we experimentally investigated the effect of the corrugation structure on the mechanical behavior of the diaphragm, and the characteristics of the corrugation shape were compared. Square and circular corrugations were formed on the square diaphragm, whereas other design parameters, such as corrugation depth and number of corrugations, remained the same except for the overall shape. The stiffness of the diaphragm was measured using LDV while applying the sound pressure. Compared with the flat diaphragm, the corrugated diaphragm shows better flexibility, and the circle corrugation shows higher compliance than the square-shaped corrugation. It was found that the symmetry of the corrugation is an important design parameter, and the effective residual stress can be theoretically calculated. The proposed design of the diaphragm shows excellent flexibility, and it has comparable compliance with the state-of-the-art diaphragm of the MEMS microphone.
Acknowledgments
This work was supported by the Technology development Program (S2942669) funded by the Ministry of SMEs and Startups (MSS, Korea).
REFERENCES
-
M. Pedersen, W. Olthuis, and P. Bergveld, “A silicon condenser microphone with polyimide diaphragm and backplate”, Sens. Actuator A Phys., Vol. 63, No. 2, pp. 97-104, 1997.
[https://doi.org/10.1016/S0924-4247(97)01532-X]

-
M. Ohring, Material science of thin films 2nd edition, Academic Press, San Diego, pp. 711-779, 2002
[https://doi.org/10.1016/B978-012524975-1/50015-X]

-
M. Fueldner, “Microphones,” in Handbook of silicon based MEMS materials and technologies, M. Tilli, M. P. Kröckel, M. Petzold, H. Theuss, T. Motooka, and V. Lindroos, Eds. Elsevier, MA, USA, pp. 937-948, 2020.
[https://doi.org/10.1016/B978-0-12-817786-0.00048-7]

-
M. Fu, A. Dehe, and R. Lerch, “Analytical analysis and finite element simulation of advanced membranes for silicon microphones”, IEEE Sens. J., Vol. 5, No. 5, pp. 857-863, 2005.
[https://doi.org/10.1109/JSEN.2004.841449]

-
P. R. Scheeper, W. Olthuis, and P. Bergveld, “The design, fabrication, and testing of corrugated silicon nitride diaphragms”, J. Microelectromech. Syst., Vol. 3, No. 1, pp. 36-42, 1994.
[https://doi.org/10.1109/84.285722]

-
R. Kressmann, M. Klaiber, and G. Hess, “Silicon condenser microphones with corrugated silicon oxide/nitride electret membranes”, Sens. Actuator A Phys., Vol. 100, No. 2-3, pp. 301-309, 2002.
[https://doi.org/10.1016/S0924-4247(02)00137-1]

-
C. H. Huang, C. H. Lee, T. M. Hsieh, L. C. Tsao, S. Wu, J. C. Liou, M. Y. Wang, L. C. Chen, M. C. Yip, and W. Fang, “Implementation of the CMOS MEMS condenser microphone with corrugated metal diaphragm and silicon back-plate”, Sensors, Vol. 11, No. 6, pp. 6257-6259, 2011.
[https://doi.org/10.3390/s110606257]

- J. Kim and W. Moon, “Development of apparatus for Single-sided Wet Etching and its applications in Corrugated Membrane Fabrication”, J. Sens. Sci. Technol., Vol. 30, No. 1, pp. 10-14, 2021.
- J. Lu, T. Ikehara, Y. Zhang, T. Mihara, T. Itoh, and R. Maeda, “High quality factor silicon cantilever driven by PZT actuator for resonant based mass detection”, in 2008 Symposium on Design, Test, Integration and Packaging of MEMS/MOEMS, pp. 60-65, Nice, France, 2008.
-
A. Dehé, M. Wurzer, M. Füldner, and U. Krumbein, “The infineon silicon MEMS microphone’, presented at the AMA Conferences - SENSOR 2013 Nürnberg, Germany, 2013.
[https://doi.org/10.5162/sensor2013/A4.3]

- W. K. Schomburg, Introduction to microsystem design 2nd edition, Springer-Verlag, Berlin, Heidelberg, pp. 43-69, 2015.


